Build App
Step 1: Website Changes
Use FTP and edit the application/config/rest.php file on your website. Change the rest_auth to basic (at line number 113) and default login credentials (at line number 213).
- $config['rest_auth'] = 'basic';
- $config['rest_valid_logins'] = ['app@goclixy.com' => 'app123@#'];
Step 2: Install Prerequisites
- Install the Node.js
- Download the Visual Studio Code editor
https://code.visualstudio.com/
- Download Java Runtime Environment for Windows/Mac and install it. Visit the Java website and download the installer.
https://www.oracle.com/java/technologies/javase-downloads.html
- Install Ionic Globally using Visual Studio Code Editor, you can also do it through command prompt.
npm install -g @ionic/clinpm install -g @angular/cli- Create a blank project using the command below:
ionic start app blank- Select Angular as the Framework during the new project.
- Press y for the Capacitor.
- Create a free account if possible.
- Go to the app folder.
- Copy src and package.json folder from the Mobile App folder to the app folder.
- Run npm install --force and the application is ready to run.
- Run npm audit fix --force to install missing dependencies.
Step 3: Prepare App
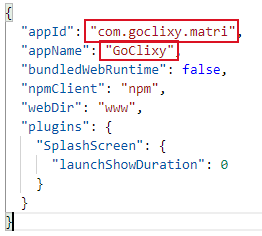
- Edit the config.json file and replace the appID and appName with your details.
- Edit the XML file and change the Widget ID, Name, Email, Website URL, and App Name

- Modify the src/environments/environment.ts and prod.ts files. Modify the following
- baseurl: URL of your domain name. e.g. https://matri.goclixy.com/mobiles
- apiUsername: Changed earlier using FTP
- apiPassword: Changed earlier using FTP
- onesignalAppId: Create a new account at https://onesignal.com/ and enter your App ID here.
- androidAppId: Get the App ID from the firebase console. Also, download the google-services.json file.
- googleMapsAPIKey: Leave the default value to demo.
- Test app by running the command below:
ionic serveStep 4: Prepare Images
Create two different images for your Mobile App to display your site brand identity.
- Icon - Size: 1024 x 1024 px (png, psd, ai)
Note: The Icon image should have no corners.
The icon is a graphic that represents your app on the device's screen.
- Splash - Size: 4096 x 4096 px (png, psd, ai)
Note: Artwork should be centered within the square, knowing that each generated image will be center cropped into landscape and portrait images.
A Mobile App takes some time to start up, especially when the app is first launched on a device. A splash screen is used to display the startup progress to the user or to indicate branding.
- After creating images, upload the splash file on the URL below to generate the different size images you need for each platform:
https://apetools.webprofusion.com/#/tools/imagegorilla
- Download the images and move them to the resources\android\icon and resources\android\splash folders.
Step 5: Build an Android APK file
- Run the following command to generate a new Keystore file:
"C:\\Program Files\\Java\\jdk-15.0.2\\bin\\keytool" -genkey -v -keystore matri-release-key.keystore -alias matri -keyalg RSA -keysize 2048 -validity 10000
- Get 256 Hash key from the release key as follow:
"C:\\Program Files\\Java\\jdk-15.0.2\\bin\\keytool" -list -v -keystore matri-debug-key.keystore
- Run the command below to add the android platform
- ionic build
- ionic cap add android
- Paste the google-services.json file (Step 3) inside the android\app folder.
- Run the command below to open Android Studio with IONIC Android files.
- ionic cap run android --prod
- In Android Studio, visit the Build->Generate Signed Bundle/APK link. Provide the Keystore file path and click the Next, Next, and Finish button.
- This will generate a release build based on the settings in your config.xml file. You can find your APK file in the android/app/release folder.
Troubleshooting
Unable to run the application, showing Cannot GET /dashboard
- Edit the tsconfig.app.json file.
- Add/Modify the include and exclude section as follows:
{
  "extends": "./tsconfig.json",
  "compilerOptions": {
    "outDir": "./out-tsc/app",
    "types": []
  },
  "files": [
    "src/main.ts",
    "src/polyfills.ts"
  ],
  "include": [
    "src/**/*.ts",
    "src/**/*.d.ts"
  ],
  "exclude": [
    "src/**/*.spec.ts"
  ]
}
Build Error: cannot find symbol android.support.v4.app.ActivityCompat
- npm install jetifier
- npx jetify
- npx cap sync android
This will change the import reference from:
import android.support.v4.app.ActivityCompat;
to:
import androidx.core.app.ActivityCompat
Ng build –prod Errors on scrollable, $event
Edit the tsconfig.json file, remove the strictTemplates property or set it to false.
strictTemplates: false